Merry Christmas! Only 2 more days after today!!! Pls talk to me if you need help/advice for this class.
Spend the next few days wisely. Friday the block rotation is 43321 and the assemblay starts at 1005
Wednesday, December 15, 2010
Monday, December 13, 2010
Monday
 Good morning, I have postponed the bleach photographs to tomorrow :)
Pls bring any old photographs (people used to get doubles and quadruples) and we will have fun with them tomorrow!!!
There is no photo of the week. Please just post ALL MISSING assignments before it is too late.
Just a reminder:Photos of the week:
Grade 11
Williams Lake---1 image
Camera Functions---post the functions available on your camera
Abstract---6 images
Motion----6 images
Lines, movement, pattern, texture---4 images for each compositional style ALL BLACK AND WHITE
Grade 12
Williams Lake---1 image
Camera Functions---post the functions available on your camera
7 sections of your portfolio
PHOTOS OF THE WEEK:
Abandoned and discarded
hands
camera tricks
unusual perspective
emotion 3 shots
http://ca.shine.yahoo.com/beauty/7-ways-not-to-pose-for-a-picture-blog-95-shine.html
Friday, December 10, 2010
Analogue Photoshop
ANALOGUE PHOTOSHOP Grab two images and start to have fun!!! experiment, experiment, experiment!

Our surroundings and how we relate to them. You can also use it in story telling in paintings. An ordinary image can become something
magical by using unusual tools and processes to change them. Here are a few ideas:
Mark making and sanding:Put picture in lukewarm water for 30 seconds. Wipe the water off and start sanding and scratching the image, distorting and changing it. You can use sandpaper, a needle, any sharp object.
Use chemicals:Use bleach to 'lift off' (or partly off) colour. Leave the bleach on for a moment and it will turn orange, leave it for longer and it will turn yellow and finally—it will turn white. Bleach part of the picture, use a bleach pen for more control.
Resist:If you want to make something with partial portions of bleach. You can use oil stick, pastel, or a sticker. The areas that are covered will act like a resist and all other areas will be bleached.
Start:
About altering images:
Working with existing images and altering them can be a lot of fun. It can be a way of examining our environment,Our surroundings and how we relate to them. You can also use it in story telling in paintings. An ordinary image can become something
magical by using unusual tools and processes to change them. Here are a few ideas:
Mark making and sanding:Put picture in lukewarm water for 30 seconds. Wipe the water off and start sanding and scratching the image, distorting and changing it. You can use sandpaper, a needle, any sharp object.
Use chemicals:Use bleach to 'lift off' (or partly off) colour. Leave the bleach on for a moment and it will turn orange, leave it for longer and it will turn yellow and finally—it will turn white. Bleach part of the picture, use a bleach pen for more control.
Resist:If you want to make something with partial portions of bleach. You can use oil stick, pastel, or a sticker. The areas that are covered will act like a resist and all other areas will be bleached.
Start:
This week the photo of the week is: ABANDONED AND DISCARDED
You will need to post the phtoo of the week by the end of the day :)
Here is a fun photo of a girl and her cat.

http://speckyboy.com/2009/08/28/25-cool-digital-photography-tutorials-techniques-and-effects/
The link above has interesting tutorials for photography.
You will need to post the phtoo of the week by the end of the day :)
Here is a fun photo of a girl and her cat.
http://speckyboy.com/2009/08/28/25-cool-digital-photography-tutorials-techniques-and-effects/
The link above has interesting tutorials for photography.
Wednesday, December 8, 2010
Good morning
Only 8 classes before winter break. Let's start the break off right by being prepared, posting and having all assignments complete before you head off on break.
Photo of the week:
Abandoned and discarded
Emotion 3 shots
Unusual Perspective
camera Tricks
Hands
Williams Lake (one shot)
Camera functions (what can your camera do?)
Assignments:
GRADE 11
Abstract 6 photos
Motion 6 photos
GRADE 12
7 sections out of 11 in Portfolio
Photo of the week:
Abandoned and discarded
Emotion 3 shots
Unusual Perspective
camera Tricks
Hands
Williams Lake (one shot)
Camera functions (what can your camera do?)
Assignments:
GRADE 11
Abstract 6 photos
Motion 6 photos
GRADE 12
7 sections out of 11 in Portfolio
Tuesday, December 7, 2010
Tuesday
Good afternoon, be aware that the small aud may not be available if the Children's theatre is performing.
ALL motion shots are due FRIDAY!! ((6 motion shots))
Assignment 7:
Lines - Movement- Pattern - Texture
ALL motion shots are due FRIDAY!! ((6 motion shots))
Assignment 7:
Lines - Movement- Pattern - Texture
For this assignment you will incorporate the some of the elements and principles of art into your images. Find examples of lines, patterns, movement and texture in everyday places. Use them to create strong Black and White images with lots of contrast.
Try using the macro function to get interesting texture. Sometimes getting up close and personal with an object can make for a dynamic image.
Try using the macro function to get interesting texture. Sometimes getting up close and personal with an object can make for a dynamic image.
It's amazing really how much there is to see in the world. Patterns are everywhere (think about objects repeating themselves.) Look for an unusual surprising pattern while you are out and about.
Criteria for Assignment #7 Line, Texture, Pattern & Movement
1. All photo's that you use for this assignment MUST be originals of yours that you took with a digital camera for this assignment (don't use old photos from other assignments.)
2. Turn in BLACK and WHITE images only! You can take them in color and change them to B&W on Photoshop, or you can change the setting on your camera to take B&W photos.
3. You need to create 4 images for each composition style. Four that show texture, four that show line, four that show pattern and four that show movement.
4. Do not digitally enhance your images too much. Use little changes like contrast or levels to make a change.
5. Create dynamic compositions. Think about what you are doing. Set up the image before you take the shot.
6. Save your images in your personal folder and upload them to your blog.
Monday, December 6, 2010
Monday afternoon
Photo of the week: ABANDED AND DISCARDED
Good afternoon, Last class I handed out the updated grades and informed MOST of you about At risk interims. If you have not updated (by last Friday) then you have been given an at risk interim. At any time, you can still post and recieve marks for your photos.
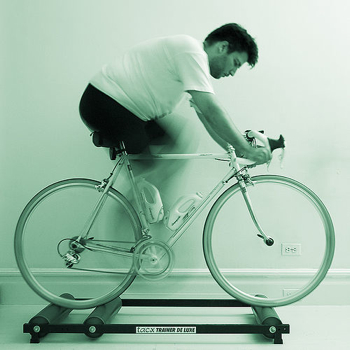
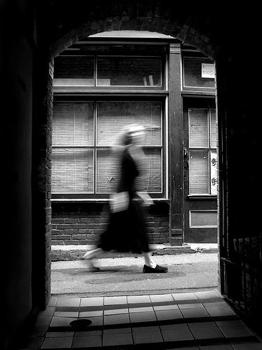
Today we will discuss motion and photography: Grade 11's have a motion assignment that is due FRIDAY for posting --you need 6 photos. Grade 12, motion is part of your portfolio so we will go over it and you may wish to work on it this week as well.Good afternoon, Last class I handed out the updated grades and informed MOST of you about At risk interims. If you have not updated (by last Friday) then you have been given an at risk interim. At any time, you can still post and recieve marks for your photos.
Unlike freeze-frame photography that captures a tiny cross-section of a moment, time-lapse, long exposure and motion blur photography shows a series of moments. They can be a few consecutive microseconds, moments spanning several years, or anywhere in between. Rather than an ultra-fast shutter speed, time-lapse and motion blur photography use a very slow shutter speed or multiple images to convey time and/or movement.
Motion blur photography often features one part of the picture in perfect focus while the moving parts are blurry
Motion blur photography often features one part of the picture in perfect focus while the moving parts are blurry


Long exposures can make for extremely interesting photographs of scenes that we don’t often get to see. Kris Klop’s photos of planes taking off show beautiful light trails that seem to make a road in the sky.

The motion blur photography of Johan L demonstrates how a longer exposure can successfully show movement, even in a still photograph. According to the photographer, his goal was to capture the motion of dance in photographs – something that he obviously did very well.


Light painting, or light graffiti, has been growing in popularity since that one fateful picture of Pablo Picasso started making the rounds among photographers. Today, the availability of good instructions and great equipment has made it possible for amateur photographers to get incredible results with this method. Painting with light in a photograph requires a long exposure time and quick movements of the light source to create ghostly shapes in the finished photo. Jacob Carter’s light painting photos show how much expression can be achieved with a light source and some willing friends.

Thursday, December 2, 2010
Thursday
Happy Thursday. I have noticed some of you have been posting, that is fantastic :)
Pls continue to do so...Remember the photo of the week is HANDS.


Pls continue to do so...Remember the photo of the week is HANDS.

Wednesday, December 1, 2010
http://www.flickr.com/photos/wlssphotography/
We will check out the photography from the students from Williams Lake.
Please check your blogs for missing assignments posted YESTERDAY<
We will check out the photography from the students from Williams Lake.
Please check your blogs for missing assignments posted YESTERDAY<
Subscribe to:
Posts (Atom)