Good afternoon. Just 3 more weeks until Christmas break!!
This is the final week to get caught up, at risk interims will be handed out next week.--so...check your blogs and make sure you are posting regularly.
Grade 11- You will need all photo of the weeks, atleast one shot for Williams lake, camera functions and assignments: Montage, abstract, motion ALL DUE THIS WEEK!!
Grade 12- You MUST have all the photo of the weeks, atleast one shot for Williams lake, camera functions and 7 Units for the portfolio: Each unit consists of 8 photos
-Portraiture
-Landscape
-Black/white
-Night Photography
-Macro Photography
-Movement
-Abstract
-Double exposure
-Wildlife or Third Party
-Extreme Lighting
-Open Theme (not just random photos but a theme: such as self portrait, emotions, nature etc.)
We will continue to look at the Photographer of the week and then we shall walk to the Library.
Tuesday, November 30, 2010
Sunday, November 28, 2010
3 weeks until Christmas break
Photo of the week: HANDS


you will be heavily marked for creativity. Please make sure you keep up with the weekly assignments. Remember to check your blogs and make note of what you need to accomplish this week. Print outs available upon request. *three weeks until Christmas break!
Photographer of the week
Snowboard/skateboard Photographer:
Fredrik A. Rasmussen
http://www.momentcorp.com/snow/snow.html


Here is a link for 'how' Fredrik creates photographic sequences
http://www.momentcorp.com/review/tutorials.html


you will be heavily marked for creativity. Please make sure you keep up with the weekly assignments. Remember to check your blogs and make note of what you need to accomplish this week. Print outs available upon request. *three weeks until Christmas break!
Photographer of the week
Snowboard/skateboard Photographer:
Fredrik A. Rasmussen
http://www.momentcorp.com/snow/snow.html
Here is a link for 'how' Fredrik creates photographic sequences
http://www.momentcorp.com/review/tutorials.html
Thursday, November 25, 2010
Thursday November 25
Good morning, please spend this block wisely- look for interesting shots of hang-out and around the school. Not your ordinary sites, make them interesting.
Also, pls check your blogs, I have posted what you are missing (Grade 11)
Poor Tom
I have not been had time to show more of Tom Hoops work so I am going to add some to look at and discuss today.


Also, pls check your blogs, I have posted what you are missing (Grade 11)
Poor Tom
I have not been had time to show more of Tom Hoops work so I am going to add some to look at and discuss today.


Wednesday, November 24, 2010
Good morning
Today we will continue with our 'fun challenge' where you are working in groups to photograph:
-where we hang out
-our school
-main street (down town)
Remember to be creative with your shots and make them interesting.
Flikr site NVSSPHOTOGRAPHY
-where we hang out
-our school
-main street (down town)
Remember to be creative with your shots and make them interesting.
Flikr site NVSSPHOTOGRAPHY
Monday, November 22, 2010
Tuesday October 19,2010
FUN CHALLENGE:
WE will be collaborating with a School from Williams Lake
http://www.flickr.com/photos/wlssphotography/
They have started to post the photos: Pls form groups of 4 and choose one of the below themes:
Main street
Our school
This is where we hang out
Pls make these interesting, our school/town will be reflected.
we have a class flikr site called NVSSphotography. I will be submitting some of the best pics from each assignment.
It is Monday!!!


Good day, today we will talk about camera tricks and tips for taking unsual photos.
LAST WEEK:
Abstract photos were due now they are PAST DUE!
We are moving onto the movement assignment:
Suggestions:
- try to stop water/liquid
- pan with a subject (follow person running with the camera as you take the shot)
- blur the background and keep the subject clear.
- try photoshop techniques
- use light and draw with it in the dark (flashlight, fire, glow stick, cell phone)
Besides the two main techniques described above, you can also freeze the entire field of vision or blur everything. Freezing the entire scene can give your photographs a unique look, especially if the objects strongly imply movement. For example, consider a bird that is flying in front of a waterfall. Both imply motion to the viewer. Freezing the entire scene captures that motion in a single moment and can produce a breathtaking image. You should use a shutter speed of at least 1/1000th of a second for this type of shot.
Assignment #6 Movement
Movement can be hard to capture. Think about implied movement as well as an action shot. Try using the difference functions of your camera in order to try and catch someone or something in motion. It's amazing really how much there is to see in the world.
This assignment is to capture movement on camera. This can be difficult if you're not careful. There is a difference between blur to show movement and just a blurry image. You can capture movement by slowing down your shutter speed, by decreasing your ISO, and/or by increasing your aperture. It is a good idea to use a tripod in these cases.
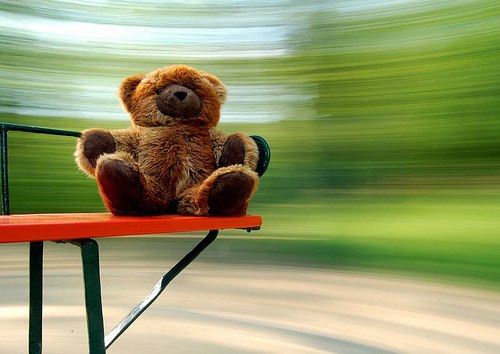
You can get a blurred background with a sharper subject by following your moving subject and then snapping the shot.
You don't need blur to show movement. If you don't have the capabilities to use a slow shutter speed and a tripod, you can also photograph the suggestion of movement. Creating images with curves can imply movement.
Criteria for assignment: Movement
You must photograph many images, experimenting with different settings on your camera. Please submit 6 perfected expressions of movement. Save the images in your folder titled: Movement.
Here are some examples of movement shots: Blurring background
 FREEZING ACTION
 complete blur
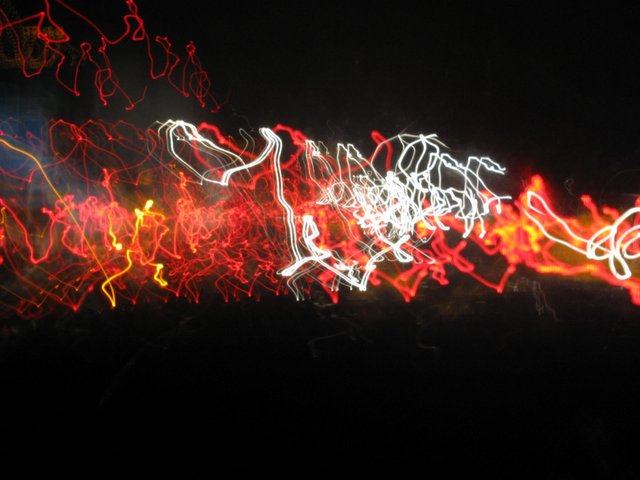 MOVEMENT WITH LIGHT
 FROZEN WATER MOTION
Sites to help with shooting movement:
http://www.digital-photography-school.com/how-to-capture-motion-blur-in-photography
http://www.digital-photography-school.com/a-beginners-to-capturing-motion-in-your-photography
http://www.dphotojournal.com/photography-tips-photos-that-capture-moving-objects-motion/
Photographer of the week:
TOM HOOPS


Thursday, November 18, 2010


Tuesday, November 16, 2010
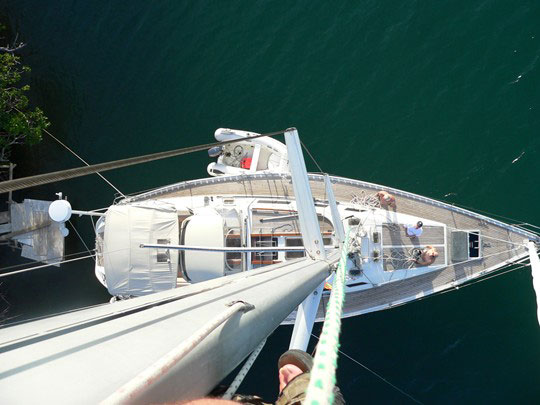 Unusual Perspective continued:

Monday, November 15, 2010
What is ISO?
What Is... ISO


![Click for original image [1.3 MB]](http://www.photoxels.com/images/Kodak/DX6490/Sample%20Images/100_0072.JPG)
![Click for original image [3.4 MB]](http://www.photoxels.com/images/Canon/eosDigitalRebel/Photo%20Samples/IMG_0342.JPG)
![Click for original image [3.0 MB]](http://www.photoxels.com/images/Canon/eosDigitalRebel/Photo%20Samples/IMG_0517.JPG)
![Click for original image [4.2 MB]](http://www.photoxels.com/images/Canon/eosDigitalRebel/Photo%20Samples/IMG_0307_2.JPG)
- If you mostly take pictures where there is enough light for a correct exposure, i.e. sunny outdoors, then using the lowest ISO on your digital camera will give you the best image quality your digital camera is capable of.
- If you want to take pictures indoors where light may not be sufficient and in other low-light situations, then you would need to supplement existing light with flash or studio lights. Either that, or select a higher ISO. Of course, depending on your digital camera, a higher ISO may mean a noisy image.
- A large image sensor (APS-sized and larger) means that you are able to use a high ISO speed without unduly worrying about noise. This means that you can take pictures in low-light situations without your pictures being under-exposed. It also means that in situations where it is required, you are able to use a fast enough shutter speed to prevent camera shake. All, again depending on your camera, without much noise.
Until consumer digital cameras start adopting the larger image sensors, noise will continue to be an ever present fact of life at high ISOs.
A little bit of noise may not be a problem depending on the size of your prints or images for display. There are also a number of noise reduction software (Noise Ninja, Neat Image) that you can use to clean up the noise, though there's quite a bit of post-processing work involved, and you might want to reserve this for the special pictures you want to print large format.
If it is a matter of choosing between not being able to take a picture and suffering a noisy image, I'd rather be able to take the picture at a high ISO and then try to clean up the noise afterwards in a noise reduction software.
But remember, to be able to do this, your digital camera must allow you to select a high ISO (ISO 400, ISO 800). Some entry-level digital cameras have only one ISO, usually ISO 64 or ISO 100.
Recap
- ISO (equivalent) speed on a digital camera gives an indication of the sensitivity of the image sensor.
- The best image quality is usually obtained at the lowest ISO setting on your digital camera.
- If by adjusting the shutter speed / aperture combinations you cannot obtain a correctly exposed picture (usually in low-light situations), then you may want to select the next higher ISO.
- However, remember that using a higher ISO usually results in noisy images on consumer digital cameras.
- Use a high ISO if it is a choice between missing a picture and being able to capture an image -- even if it means you need to spend time cleaning out the noise in post-processing using a noise reduction software.
- If you leave your camera on "Auto ISO" and if you find that most of your images are noisy, then perhaps you are taking most of your pictures in low-light situations where the camera has automatically selected a higher ISO.
- If you are printing mostly 4x6 in., you may find the noise is not evident in the prints (and so you don't need to worry about noise at high ISO) though they may be visible at original sizes on screen.
Related Tutorials:
Related Links:
Read this article at:
http://www.photoxels.com/tutorial_iso.html
Friday, November 12, 2010


 ISO : ISO is the first thing I set when entering into a shoot. I base my ISO on the shadows and dark areas of the scene, rather then the the ones that are heavily lit. All ISOs can expose well-lit subjects, but only high ISOs can expose dark areas. The second thing I look at is the speed of my lens. If I have a fast lens (i.e. f2.8) then I know I can push my ISO down a touch. I will also consider my subject. If my subject is static and I can shoot long exposures without risking motion blur then I’ll push my ISO lower, whereas fast-moving subjects require fast shutter speeds and often high ISOs.
 WB : I ask myself: how many types of light are present? Which color of light is best to balance to? For instance, if I’m shooting outside then I’ll set my white balance to daylight (6000 degrees kelvin). If I’m shooting a home interior lit with daylight through open windows, and tungsten light from the interior fixtures, then I opt daylight and often use my flash to counteract the tungsten light. Sometimes I try to adjust all lighting so it’s the same color by using gels, swapping bulbs, etc. Other times it works nicely just to let all the different colors of light bee seen – like at crazy rock shows.
 Av : I start by looking at my available light and get an idea of what aperture range I’m looking at. Lots of light means a broader range of choice. Second, I’ll think about the shot itself and what depth of field I want. If I want lots of detail at all depths, then I’ll drop it down as low as f22. If I want a soft background, with a refined range of focus, then I’ll open it up to f2.8 or larger. Sometimes you don’t have a lot of choice, so the wider (lower number) the better. That’s why lenses with apertures like a fixed f2.8 are so expensive – because they’ll benefit you in low light. It’s also important to consider your subject – fast moving subjects will require lower apertures, so you can achieve faster shutter speeds.
 Tv : The length of the exposure has huge bearing on the outcome of a shot. I start by looking at my subject and whether or not I want them sharp or blurred. Some subjects like city traffic benefit from long exposures, while others suffer. I try to stay at 1/60 of a second or faster when I’m shooting handheld, and use a tripod for slower exposures. Stillness varies from person to person, and image stabilizers will help. Fast subjects require fast shutter speeds.
 MF : If my lens is struggling to find contrast in a shot, or focuses on the wrong thing, then it goes straight to manual. Most digital SLRs will even give you a audible or visual cue when you’re manually focused correctly. I try to avoid focusing on my subject center frame, and often try to manually keep my focus while reframing in accordance with the rule of thirds. Trusting my auto focus has ruined more shots than I can count. If you eyesight is a tad out, then make sure to set your diopter accordingly. Learn to trust your eyes.
Subscribe to:
Comments (Atom)